|
 3-Way High Efficiency Speaker
(Lavoce, Dynaudio, Foster 3-way. October-2023)
LCR MTM 3-Channel Speaker
(Three MTM Speakers in One. July-2023)
Mini7bt - A Minimus 7 Portable Bluetooth Speaker
(Minimus 7 and Dayton Audio. Spring-2022)
2-Way Ribbon Tweeter Speakers
(Vifa and Pioneer. May-2020)
Transmission Line Speakers
(Aborted attempt at a TL. September-2012)
Acoustic Research AR-4x Rehab
(Rehab of a garage sale find. January-2016)
Infinity RS-4000 Rehab
(Rehab of a garage sale find. June-2015)
Polaris
(A tall, thin, upwards firing omnidirectional speaker. May-2010)
Shiva_PR15
(A powered subwoofer using a 12" driver and 15" passive radiator. Jan-2010)
Can-Less
(A computer speaker; redux. December-2005)
Can-Can
(A computer speaker in a light canister. Jan-2005)
Sonosub
(10" vented subwoofer in a cardboard tube, powered by a Parapix amp. May-1999)
MTM Center Channel Speaker
(A Madisound design. Nov-1997)
2-way Surround Speakers
(5" woofer and 1" tweeter. July 1997)
3-piece mini system
(6" DVC bass module mated to 4" car speaker. June 1997)
3-way Vented Floorstanding Speaker
(vented 10" woofer, 5" mid and 1" tweeter in a 4
ft tower. Summer 1995)
NHT1259 Subwoofer
(A 12" woofer in a sealed architectural pedestal. Winter 1994-95)
Inexpensive Speaker Stands
(Particle board, sand and spray paint. Fall 1994)
2-way satellite
(6.5" woofer and 1" tweeter. Summer/Fall 1994)
| Audio Electronics Related Projects |
900 MHz Audio Receiver
(Better use for bad headphones. Jan-2008)
Buster - A Simple Guitar Amp
(Perfect for the beginner. Jan-2010)
A PC-based Audio Console
(Use a PC to play tunes. Jan-2010)
LM-12 Amp
(Bridged LM-12 opamps. Aug-2003)
CeeDeePee
(A CD player and FM tuner from spare computer parts. Oct-2002)
Quad 2000 4-Channel Amp
(Premade modules by Marantz. May-1998)
Zen Amp and Bride of Zen Preamp
(by Nelson Pass. Apr-1997)
Using Wood in Speakers FAQ
(Work in progress)
MDF FAQ for speaker builders
Woodworking Tools for the DYIer
(HomeTheaterHiFi.com Oct-1998)
Some Thoughts on Cabinet Finished for DIY Speakers
Large Grills Made Easy
Some Parts Suppliers
(Outdated)
DIY Audio Related URLs
Veneering Primer
(by Keith Lahteine)
How to get a Black Piano Finish
(by DYI Loudspeaker List members)
Sonotube FAQ
(by Gordon McGill)
Excerpts from the Bass List
(Oldies but Goodies)
DIY Loudspeaker List Archives
|
|
Inexpensive
Speaker Stands
After building
a pair of small 2-way speakers, I found myself in need of
speakers stands. With the speakers done, what I really wanted
to do was listen to them, not spend more time and resources
building things. The result is a pair of inexpensive sand-filled
speaker stands built from 5/8 inch particle board (sold locally
as "shelving" material) requiring minimal time and
effort.
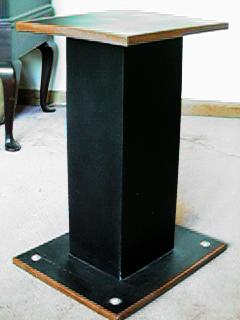 Here is a picture of the stand. I gamma
corrected it to more closely resemble the actual stand color.
Naturally, what you'll see depends a lot on your monitor and
its settings. The actual color is deep flat black with a satin
topcoat and the wood strips are mahogany.
Here is a picture of the stand. I gamma
corrected it to more closely resemble the actual stand color.
Naturally, what you'll see depends a lot on your monitor and
its settings. The actual color is deep flat black with a satin
topcoat and the wood strips are mahogany.
There are
three parts to this stand. - the top, bottom and middle column.
Each is easily scalable to fit individual needs. The top and
bottom are each made of a single sheet of 5/8 inch particle
board (PB) measuring (in inches) 12 x 10 5/8 and 14 3/8 X
11 3/4 respectively. The external dimensions of the column
(as viewed from the front) are 5 7/8 wide, 7 deep and 18 1/2
tall. Note that the dimensions used were based on four simple
limitations - (1) the size of my speakers, (2) the proportions
of the pieces that looked reasonably good, (3) the amount
of PB I had on hand (4) and having something that would be
able to support the speaker without tipping over.
Construction
began with the center column. Each column consists of 4 pieces
of PB held together with regular wood glue and biscuits. The
joints are simple butt joints - nothing fancy. The biscuits
are used mainly for alignment. PB screws can also be used,
but they would have to be countersunk to cover them up. Since
the joints are all on edges, I decided not to use screws to
avoid possibly chipping an edge. I was very generous with
the glue since PB has many small voids. Once this was dry,
I caulked the inside of each joint with regular silicone caulk.
This is to ensure that there are no holes as the column will
eventually be filled with fine, dry, play sand. The four outside
surfaces are then sanded and the four main edges softened
(smoothed over with 100, then 150 grit sandpaper). Spackling
paste is then used to fill large gouges and voids, especially
on the ends of the PB. When dry, the surfaces are sanded again
to the desired "feel". I left mine lightly textured
(didn't try to fill all voids) rather than go for that piano
look.
The top
and bottom pieces are centered and glued to the column. The
bottom piece is also screwed from below since those screws
won't show. After mounting the bottom and before mounting
the top, fill the center column with sand. I heated the sand
in the oven first to remove excess moisture. Since I was going
for cheap stands I tried real hard to use only what I had
on hand. In my case, I did not have enough sand to completely
fill both columns. My solution was to add a center partition
in the column, thus forming an upper and lower chamber. I
only filled the lower chamber of the columns. The addition
of the center divider complicates construction so don't do
it unless you have to. One caveat - my completed stands weigh
in at over 20 pounds each and can be lifted from the top (the
glue is darn strong). Filling the entire column will add more
weight and further deaden the stand. However, it will place
more stress on the glue joint if you try and pick up the stand
holding only the top. I suggest you pick it up from the bottom
just to be safe.
The top
and bottom PB was sanded and spackled in the same way as the
center column. When done, the entire unit was spray painted
with Rustoleum brand paint. I found this paint to adhere well
to PB and spackle. I used two coats of flat black. A safer
thing to do is to first apply a primer before the paint. This
will provide a more even appearance since the PB and spackle
adhere to paint differently. Finally, I sprayed a protective
clear satin topcoat (forgot brand, recommended by store clerk.
Be sure to check that it won't react with the paint used).
Since my
speakers were finished with a rosewood veneer, I decided to
cover the edged of the top and bottom plates with thin strips
of mahogany. These 3/16 inch thick strips of wood, 5/8 inch
wide, cover any defect along the edges (where it's easiest
to bang up) and provide continuity with my speakers in overall
"look". Since the stands are placed on a thick carpet,
I "spiked" the stands by mounting four large 1 inch
deep rubber feet to the bottom. These feet are held in place
with a nut, bolt and washer. The bolt and washer are visible
and I made no effort to hide them. The feet could also have
been mounted from the bottom with just a short wood screw.
That's all
there is to it. I hope I have adequately described my stands.
They are easy to make and easily modified to suit individual
needs and tastes. For examples, it's possible to build multiple
columns per stand, or to use spray-on textured paint for that
rock look and feel. The bottom line is that solid, SAF-friendly
stands can be made cheaply and easily using readily available
materials.
|
|
29-September-2000
Note: The
contents in these pages are provided without any guarantee,
written or implied. Readers are free to use them at their
own risk, for personal use only. No commercial use is allowed
without prior written consent from the author.
|
|
 |