|
MTM
Center Channel Speaker
Introduction
In building
this center channel speaker, I combined a number of goals
and interests into one project. The points of interest
for me are (in no particular order) : to build and listen
to a mid-tweeter-mid (MTM) speaker, to match the timber of
my main (front left and right) speakers as closely as possible,
to audition and compare an existing kit design, and to build
it all cheaply by using whatever materials I already have.
My main
speakers are a 2 way sealed
design using an Audio
Concepts (ACI) AC-7 woofer and a Vifa
D25AG-05-06 tweeter. Neither of these drivers are shielded
for A/V use thus making them unusable for a center channel.
Luckily, Vifa makes a shielded version of the tweeter - the
D25ASG-05. As for the woofer, the AC-7 is very similar to
Vifa's C17WG drivers. The C17WG is not shielded but
others in the product line are; notably the M13SG-09-08 and
M17SG-09-08. Both of these mid bass drivers have a coated
paper cone like the AC-7. The shielded drivers differ
from the AC-7 in their use of cast frame, and a rubber surround.
My original plan called for the use of two M17SG drivers.
However the resulting box size just didn't seem right sitting
atop my television. Using the M13SG driver yielded a
more reasonable box size, though still rather large.
The Kit
As luck
would have it, Madisound
has a Vifa kit utilizing two M13SG-09-16 and one D25ASG-05.
The kit can be purchased complete with all parts and cabinet
or as individual pieces. Since I wanted to build the
box to suit my taste and decor, I bought the woofers and crossover
(I already had the tweeter). Incidentally, the M13SG-09
comes in both an 8 ohm version (-08 suffix) and 16 ohm version
(-16 suffix). The 16 ohm version allows two such drivers
in parallel to yield an 8 ohm nominal impedance.
The claimed
response by Madisound is 40 Hz to 35 KHz vented and 80 Hz
to 35 KHz sealed. My own calculations yielded an F3
of above 100 Hz in a sealed cabinet. While a DVD center
channel (Dolby
Digital) is full range, most decoders allow the bass to
be transferred to other full speakers. Since I'm not as fond
of the sound of vented cabinets speakers in general, I sacrificed
the bass response and built a sealed speaker.
For the
cabinet volume, I took the stock Madisound cabinet (18.5 H
x 8 W x 10.5 D when placed vertically), subtracted 3/4 inches
(19 mm) on each face for the cabinet walls and arrived at
an internal volume of 0.58 cu. ft. For a center channel,
I was willing to stretch the speaker out sideways (height)
in exchange for a reduced depth while keeping the width the
same. Reducing the depth makes it an easier fit for
the television. Another limiting factor was my supply
of construction material. As was the case with my surround
speakers, I wanted to consume leftover MDF and particle
board and avoid having to buy new stock. After juggling with
the materials on hand, I came up with a box measuring 22-1/2
x 7-3/4 x 8-7/8 (external). The internal dimensions were 21
x 6-1/2 x 7-3/8 or 0.58 cu. ft. More on the box later.
The crossover
Madisound's
crossover comes pre-assembled on a single sided glass epoxy
printed circuit board. The PCB looks like it was designed
for a generic layout. All parts were soldered on the foil
side of the board and held down with some silicone-like material.
Tabs allow for signals to enter and leave the PCB. Four
holes at the corners are used to secure the PCB to the cabinet.
The quality
of parts varied with function. Critical capacitors in
the tweeter signal path are polypropylene, while other less
critical caps are mylar and NP-electrolytic. All inductors
are air-core of varying gauges. Resistors are sand-cast.
Overall, the quality is very good, making reasonable tradeoffs
to keep cost down. This is not a cost-no-object crossover,
but rather a smart and economical implementation of a design.
The circuit
consists of a second order low pass filter on the woofer,
a third order high pass filter on the tweeter with impedance
compensation and an LCR circuit whose purpose I am not totally
sure of. It never occurred to me to measure the drivers
individually with the crossover prior to final assembly !
I also do not have any manuals or official kit information
(since I only bought the crossover). My guess
based on the crossover parts is that the 2nd order low pass
filter is set at about 2500 Hz while the 3rd order high pass
is set to about 4000 Hz.
Measured
Results
A Radio
Shack SPL meter was used to measure the resulting in-room
response. This meter is limited to about 10 KHz on the high
end, and the speaker is limited on the low end. I therefore
measured the speaker in the range of 100 Hz to 10 KHz. Three
sets of measurements were taken - on-axis, 30 degrees off-axis
horizontally and 30 degrees off-axis vertically. The
speaker was laid on its side on top of a television with the
tweeter's center about 52 inches above the floor. This
probably seems high but the current setup of my room left
me with only this options. The off-axis degrees are
approximate. Input voltage is 2.81 volts and the test source
was Stereophile's Test CD2. All references made here relating
to orientation (up, down, left, right, width, height, etc.)
are made relative to the speaker lying on its side.
As expected
the on-axis response at 100 Hz is down considerably (78 dB)
- over 10 dB below the level at 125 Hz (88.5 dB). The response
from 125 Hz to 3150 Hz is very flat, measuring 90 dB +1, -1.5
! Between 4 KHz and 8 KHz, the measured response suddenly
rises as much as 6 dB before returning back to 91 dB at 10
KHz. In listening tests, there is a slight brightness
when listening to some classical pieces but it is not harsh
nor "tinny". Vocals are very smooth, probably in
part due to the nice mid bass response curve. Bass is
practically non-existent as expected.
Off-axis,
the 30 degrees vertical (down) measurements were within 2dB
of the on-axis measurements showing the excellent dispersion
of the MTM topology. This is consistent with the Madisound
claim that this speaker is designed for wide horizontal dispersion
when standing up. In the horizontal plane, the 30 degrees
off-axis measurements is down about 6 dB between 800 Hz and
3150 Hz. Above this, the tweeter's output dominates and is
about 2 dB down from on-axis measurements to 10 KHz.
The box
As mentioned
earlier, I made this box from what is essentially leftover
scrap. Again with the speaker lying on its side, the front
and rear panels are 3/4 inch birch veneered MDF. The
short side panels are 3/4 inch thick high quality particle
board I salvaged from a box used in shipping heavy equipment.
The top and bottom panels are 5/8 inch particle board typically
found in your local home center.
I began
construction with a router; cutting out four circles - a terminal
cup on the rear panel, two woofers and a tweeter on the front
baffle. All drivers are recessed so as to mount flush
with the baffle. The woofer and tweeter spacing is minimized
as much as possible. Five panels (excluding the front
baffle) are then glued together with yellow wood glue using
simple butt joints. Before all the glue sets, I scrap off
leaking glue on the inside joints. This is done to provide
a nice clean right angled surface to glue corner reinforcements
on all inside edges. Inside reinforcements are also
added for the not-yet-mounted front baffle. These later double
as baffle supports. The rear, top and bottom panels
gets an added rib to roughly divide the middle of the panel.
The front baffle gets 2 ribs, one between each woofer and
tweeter. The rear, sides, and bottom then received a single
layer of 50 pound roofing felt in the remaining space. For
the top I tried an experiment by gluing a layer of thick egg
crate foam. Why you ask ? why not ! All seams
are caulked and the crossover board (with wires pre-soldered)
was mounted before the front baffle was glued in place with
a very generous amount of glue. Additional caulking
was added on the baffle's inside seams.
With the
box done, I ran it through the table saw to remove the four
front-to-back edges. These rectangular spaces are eventually
filled with solid cherry wood. The back and front baffle
were actually spray painted black and top-coated prior to
assembly. The remaining sides were veneered with rosewood
to match the other speakers in the setup. The finish
is Danish oil and wax.
Just before
mounting the drivers, I added some R19 fiberglass insulation
to the chassis cavity. The crossover wires are then
soldered to each driver, being careful to keep the polarity
correct. A thin layer of weather-stripping rope caulk is applied
to each driver opening before the driver is finally screwed
down with particle board square drive screws.
For the
baffle, I decided against a grill that would cover the entire
baffle, as I have done with the other speakers in this setup.
Instead I wanted a grill that appeared somewhat inset.
To do this, I added a solid cherry edge around the front baffle.
This edge has a 1/4 inch round over and adds about 1/2 inch
to the overall depth of the speaker. The grill then fits inside
this edge, protruding about 1/4 inch. The grill itself is
a 3/4 inch particle board frame with black acoustical fabric
stretched and hot-glued on the inside edges. Ball and
socket connectors are used to mount the grill to the baffle.
The resulting
box is quite heavy, dense and rigid. It does not exhibit noticeable
vibrations when in use.
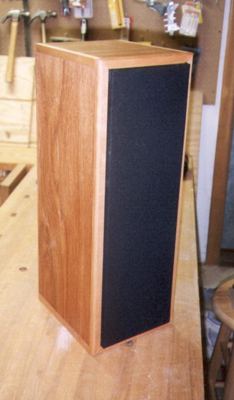
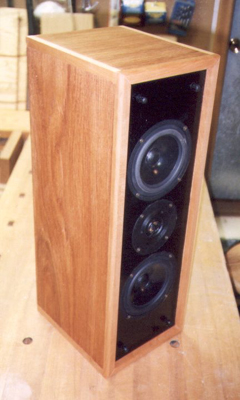 Here is what the completed speaker looks
like with the grill on and off.
Here is what the completed speaker looks
like with the grill on and off.
|