|
 3-Way High Efficiency Speaker
(Lavoce, Dynaudio, Foster 3-way. October-2023)
LCR MTM 3-Channel Speaker
(Three MTM Speakers in One. July-2023)
Mini7bt - A Minimus 7 Portable Bluetooth Speaker
(Minimus 7 and Dayton Audio. Spring-2022)
2-Way Ribbon Tweeter Speakers
(Vifa and Pioneer. May-2020)
Transmission Line Speakers
(Aborted attempt at a TL. September-2012)
Acoustic Research AR-4x Rehab
(Rehab of a garage sale find. January-2016)
Infinity RS-4000 Rehab
(Rehab of a garage sale find. June-2015)
Polaris
(A tall, thin, upwards firing omnidirectional speaker. May-2010)
Shiva_PR15
(A powered subwoofer using a 12" driver and 15" passive radiator. Jan-2010)
Can-Less
(A computer speaker; redux. December-2005)
Can-Can
(A computer speaker in a light canister. Jan-2005)
Sonosub
(10" vented subwoofer in a cardboard tube, powered by a Parapix amp. May-1999)
MTM Center Channel Speaker
(A Madisound design. Nov-1997)
2-way Surround Speakers
(5" woofer and 1" tweeter. July 1997)
3-piece mini system
(6" DVC bass module mated to 4" car speaker. June 1997)
3-way Vented Floorstanding Speaker
(vented 10" woofer, 5" mid and 1" tweeter in a 4
ft tower. Summer 1995)
NHT1259 Subwoofer
(A 12" woofer in a sealed architectural pedestal. Winter 1994-95)
Inexpensive Speaker Stands
(Particle board, sand and spray paint. Fall 1994)
2-way satellite
(6.5" woofer and 1" tweeter. Summer/Fall 1994)
| Audio Electronics Related Projects |
900 MHz Audio Receiver
(Better use for bad headphones. Jan-2008)
Buster - A Simple Guitar Amp
(Perfect for the beginner. Jan-2010)
A PC-based Audio Console
(Use a PC to play tunes. Jan-2010)
LM-12 Amp
(Bridged LM-12 opamps. Aug-2003)
CeeDeePee
(A CD player and FM tuner from spare computer parts. Oct-2002)
Quad 2000 4-Channel Amp
(Premade modules by Marantz. May-1998)
Zen Amp and Bride of Zen Preamp
(by Nelson Pass. Apr-1997)
Using Wood in Speakers FAQ
(Work in progress)
MDF FAQ for speaker builders
Woodworking Tools for the DYIer
(HomeTheaterHiFi.com Oct-1998)
Some Thoughts on Cabinet Finished for DIY Speakers
Large Grills Made Easy
Some Parts Suppliers
(Outdated)
DIY Audio Related URLs
Veneering Primer
(by Keith Lahteine)
How to get a Black Piano Finish
(by DYI Loudspeaker List members)
Sonotube FAQ
(by Gordon McGill)
Excerpts from the Bass List
(Oldies but Goodies)
DIY Loudspeaker List Archives
|
|
Quad 2000 Four Channel Amplifier
Update (3-January-1999)
I finally
gave it a name - Quad 2000. After all, it's made of four MA-500
modules !
Update (3-December-1988)
The picture
of the chassis below shows the transformer mounted against
the rear panel. Immediately to the left is one of the amplifer
modules. Towards the top of each module is the input phono
plug connector. With the transformer mounted as shown, that
first monoblock obtained a significant amount of interference
from the transformer in the form of a low, but audible hum.
This problem was solved by mouting the transformer against
the side wall on the right (not shown in the picture below)
90 degress to its shown position. Doing so required that one
of the fuse blocks also be moved to the side wall to make
room for the transformer.
(Original text)
Here's a
quick look at my completed four channel amplifier using Marantz
amplifier modules.
The
modules were purchased in 1997 (February ?) and are presumably
the same ones used in the highly acclaimed
Marantz
MA500 monoblock amplifier and the discontinued Carver
AV-806x 6-channel home theater amplifier. Both are THX certified.
The former is rated at 125 watts in 8 ohms with <0.05%
THD while the latter is rated at 133 watts per channel into
8 ohms with <0.032 % THD+N. The Carver unit consists of
6 modules mounted side-by-side and is powered by two front-mounted
transformers (three modules per transformer).
For
this project, I used a case I already had - an LG-1925 from
Mark V Electronics. This case measures 5 inches tall by 17
inches wide by 11-1/2 inches deep - just tall enough for the
modules. The transformer is a custom-made unit from
Ulveco.
It's secondaries are rated at 92VCT @ 5A and 32VCT @ 0.34A.
At just under 5 inches in diameter, it too was able to fit
standing up.
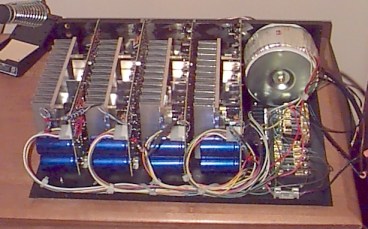 This picture shows the position of the
various parts inside the case. In front of the transformer
are two fuse blocks (4 fuses each) from Parts
Express and two 8-position barrier/terminal strips from
Radio
Shack. Two 8 amp fuses protect each module's +/- 46V rails.
At the lower left, an additional 6 amp slow-blow fuse protects
the main AC line. Wiring is modular, to enable easy debugging
during construction. Each module has a 6 wire cable that's
tied to the bottom plate of the case with nylon ties. Each
of the 6 wires is connected either to the terminal strips
or the fuse block via screws. Not shown in the picture above
is an additional two wire cable from each module to light
the front panel module power LED via a 1 k-ohm resistor.
This picture shows the position of the
various parts inside the case. In front of the transformer
are two fuse blocks (4 fuses each) from Parts
Express and two 8-position barrier/terminal strips from
Radio
Shack. Two 8 amp fuses protect each module's +/- 46V rails.
At the lower left, an additional 6 amp slow-blow fuse protects
the main AC line. Wiring is modular, to enable easy debugging
during construction. Each module has a 6 wire cable that's
tied to the bottom plate of the case with nylon ties. Each
of the 6 wires is connected either to the terminal strips
or the fuse block via screws. Not shown in the picture above
is an additional two wire cable from each module to light
the front panel module power LED via a 1 k-ohm resistor.
Each
module is attached to both the bottom plate as well as the
rear plate. Everything needs to be well alligned for this
to work so I had a local metalworker do the drilling.
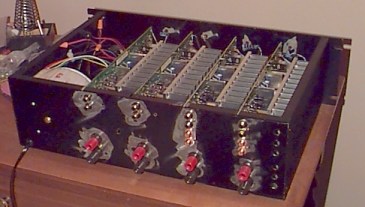 This is the rear of the unit. Note that
two of the four modules are "slave-only" and do
not have the RC-5 RCA connectors (which I opted not to use
anyway). Some of the black finish has been removed during
drilling.
This is the rear of the unit. Note that
two of the four modules are "slave-only" and do
not have the RC-5 RCA connectors (which I opted not to use
anyway). Some of the black finish has been removed during
drilling.
|
|
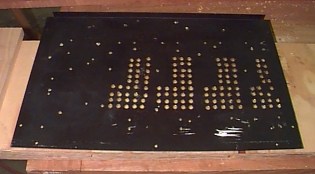 Holes were added to the bottom plate for
air circulation. Like the rear, some of the existing holes
are from previous projects that used to be in this case.
Holes were added to the bottom plate for
air circulation. Like the rear, some of the existing holes
are from previous projects that used to be in this case.
|
|
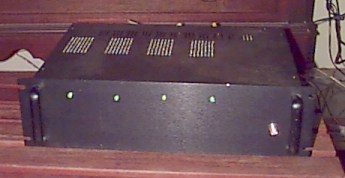 The top plate also had holes added - a
total of 364 ! - for circulation. They can be seen on this
picture of the completed unit. The front consists of four
green LEDs, one per module, and an orange neon power switch.
The green LEDs for the RC-5 capable "master" modules
are driven by the "power" signal. On the slave units,
the LED is driver by the board's regulated +15V line.
The top plate also had holes added - a
total of 364 ! - for circulation. They can be seen on this
picture of the completed unit. The front consists of four
green LEDs, one per module, and an orange neon power switch.
The green LEDs for the RC-5 capable "master" modules
are driven by the "power" signal. On the slave units,
the LED is driver by the board's regulated +15V line.
That's
all on this project. I've knowingly left out a lot of detail
for the simple lack of writing time. The amp has been about
a year in the works, with many months of indecision over what
to do and how to do it. Now that it's done, I can finally
sit back and enjoy them. The modules are outstanding and deserving
of their reputation in their commercial incarnation.
Thanks
I
have a lot of people to thank for making this possible, including
Joe Reynick, Art Povelones, Bob Garnaas, Dan Turner, Russell
Holm, Jeff Burger, Rex Gordon, Tom Williams, Michael Chizmar
and Will Law. I apologize for leaving anyone out. Thanks guys
!
29-September-2000
Note: The
contents in these pages are provided without any guarantee,
written or implied. Readers are free to use them at their
own risk, for personal use only. No commercial use is allowed
without prior written consent from the author.
|
|
 |