|
3
Piece Mini System
Introduction
 As part
of my on-going attempt to use up "stuff" I've collected
over the years, I'd deciced to build a three piece mini speaker
system consisting of two mini satellite cubes and a bass module.
The system would be used in a non-critical setting with a
less-than-ideal setup such as a kitchen. High SPL is not required.
The goal is to create something usable, cheaply, without placing
much emphasis on overall quality. Net audio quality will nonetheless
likely be on-par with similar mass-market systems selling
at higher prices.
As part
of my on-going attempt to use up "stuff" I've collected
over the years, I'd deciced to build a three piece mini speaker
system consisting of two mini satellite cubes and a bass module.
The system would be used in a non-critical setting with a
less-than-ideal setup such as a kitchen. High SPL is not required.
The goal is to create something usable, cheaply, without placing
much emphasis on overall quality. Net audio quality will nonetheless
likely be on-par with similar mass-market systems selling
at higher prices.
 The main
parts I wanted to "recycle" were a pair of 4 inch
Kenwood car speakers left over from my old car. For the box,
I had various decently sized pieces of 5/8 inch particle board
suitable for the bass module and smaller pieces of MDF for
the cubes. Leftover grill fabric, veneer, and crossover components
make up the rest of the spare parts list. The main
parts I wanted to "recycle" were a pair of 4 inch
Kenwood car speakers left over from my old car. For the box,
I had various decently sized pieces of 5/8 inch particle board
suitable for the bass module and smaller pieces of MDF for
the cubes. Leftover grill fabric, veneer, and crossover components
make up the rest of the spare parts list.
The drivers
The 4 inch
car speaker is a 4 ohm Kenwood unit of unknown model. I've
had these driver for over 10 years and they've served their
purpose well in my old car. After my car stereo was stolen,
I removed these since the new stereo only powered the rear
speakers. These drivers have a "whizzer" cone and
a silver-colored dust cap. They sound about as good as cheap
"full range" car speakers can sound, which is not
a whole lot better than your average low budget boom box.
The woofer
is a "special" from Parts
Express. This is a 6 inch dual voice coil shielded driver
by Pyle with a coated paper cone. The specs include : Fs =
56 Hz, SPL = 89 dB, Vas = 0.46 cu. ft., Qms = 7.98, Qes =
0.44, Qts = 0.42, Impedance = 8 ohms per coil, cost = $17.50.
I didn't care for the shielding, which wasn't very good. Overall
quality was acceptable.
The crossover
I wanted
to keep the crossover as simple as possible. Since the speakers
would primarily play the role of creating ambience, why spend
the time to get everything just right ? It just wasn't worth
the effort given the quality of the components in use.
My starting
point was a 10 mH iron core inductor and some electrolytic
capacitors left over from an old subwoofer passive filter.
I installed the inductor in the bass module and took measurements.
I then measured the cubes and noted that their response fell
from about 160 Hz. This is a bit high to avoid directionality
but it would have to do. With some experimentation, I came
up with a second order low pass filter consisting of a 10
mH inductor and a 100 mfd electrolytic capacitor. The high
pass was only a 160 mfd (actually 100 + 50 + 10) electrolytic
capacitor which combines with the driver's natural rolloff.
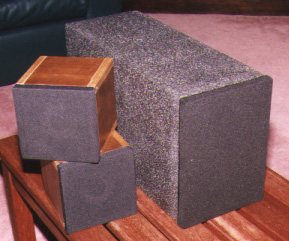
The box
Each cube
is an MDF box sized just big enough to hold the 4 inch driver.
The external dimension, excluding the grill, measured (in
inches) 5.5 wide, 5.5 high and 5 deep. The grill added another
5/8 inch to the depth. All panels are glued and screwed together.
The interior seams are caulked. The four side edges are removed
and replaced with solid poplar, lightly chamfered to soften
the edge. The sides are veneered with imbuya - a wood with
a walnut-like look - and finished with danish oil and polyurethane.
The grill
consists of a piece of plywood with the center removed. Grill
fabric is stretched over the frame, then stappled and hot
glued on the reverse side. The entire grill is subsequently
hot glued to the baffle. No provisions are made to allow removal
of the grill other than to pry it off the baffle. Hot glue
is not all that strong and much easier to deal with than trying
to add ball & socket connectors that won't have room to
fit !
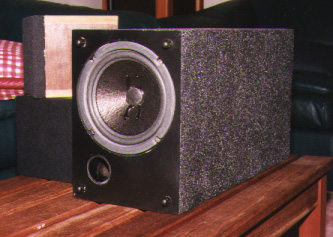
The bass
module was made of 5/8 inch particle board (MDF would have
been better but I only had small pieces which were used on
the cubes). The exterior dimensions in inches are 18.25 deep,
10.25 wide and 7.25 high. This gave an internal volume of
about 0.5 cubic foot, not counting the port and driver volume.
Like the cubes, only glue and screws holds this box together.
Inner seams are caulked but there is no internal bracing.
The driver is recess mounted to fit flush against the baffle
and is located off-center so that a 1.5 inch (inside) diameter
cardboard port tube can also be mounted to the baffle. The
port is slightly longer than 2 inches. A grill similar to
the ones used on the cubes is used for the bass module except
that ball & socket connectors are used for easy grill
removal.
On the rear
of the unit, an 8 terminal speaker cup is mounted to provide
left and right channel input sand high pass filtered outputs
for the cubes. All crossover components are mounted inside
the bass module and can be accessed by removing the terminal
cup.
Prior to
applying the finish, I sealed all cracks and voids in the
particle board with wood putty. I also used the putty to even
out some misaligned joints. For the finish, I first sprayed
all sides with flat black Rustoleum brand spray paint. This
is my favorite spray paint as it adheres very well to all
types of surfaces including particle board. For the four large
sides, I sprayed on Krylon's two-part "Make It Stone!"
finish in Obsidian. Obsidian is black with white specks for
a granite look and feel. The first part gives the color and
texture while the second part is a clear protective topcoat.
The front and back only had the original flat black paint
but they too got the clear topcoat. The overall effect is
quite nice and best of all, it's very simple and quick to
apply.
The result
Measurements
taken from a Radio
Shack SPL meter showed the combined units to be flat (+/-
3 dB in-room) from about 63 Hz to 1600 Hz. Then to about 4000
Hz, there is a 3dB rise, some of which is probably due to
the baffle step. Between 5000 Hz and 8000 Hz, response rises
another 3 dB and has a distinctly "whizzer cone"
sound. I considered removing the "whizzer" cone
but if I didn't do a clean enough job with the knife, it would
probably have sounded even worse. Luckily, the sound was not
harsh. Besides, I reasoned that once in use, the chance of
actually listening to the cube inline with the driver was
small thus its effects would be much less noticeable.
Clearly
this is not a sonic masterpiece by any means but it will do
nicely for cheap, non-intrusive sound with decent bass. And
therein lies the main difference between it and the mass market
cube + air-blowing bass modules. Whereas this bass module
is a bit larger at 1/2 cu. ft., it also delivers quality bass.
There's no wind noise or boom so often found in compact systems
today. So for a total cost of about $25 - mainly for the woofer
and spray paint - I now have a mini system that sounds fairly
decent.
Update
8/97
Two factors
made me update the cubes - they were ugly and my wife liked
the granite look on the bass module. Since I still had about
one third of the granite spray left, I sprayed the cubes to
match the bass module. Goodbye wood look, hello matching set
!
29-September-2000
Note: The
contents in these pages are provided without any guarantee,
written or implied. Readers are free to use them at their
own risk, for personal use only. No commercial use is allowed
without prior written consent from the author.
|