|
2-way
Satellite Speakers
Introduction
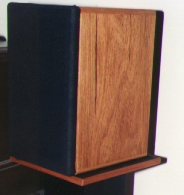
 My 2-way satellite speakers seen here from the front and back
were built in the summer and fall of 1994.
Due to a number of extended business trips, they were built
in stages as time permitted. The original intent was to tune
the crossover myself, starting with a basic, textbook, formula
driven circuit. But as my travels came to an end, all I wanted
to do was sit back, relax and enjoy them. And so the original
textbook crossover remained in place for about a year.
My 2-way satellite speakers seen here from the front and back
were built in the summer and fall of 1994.
Due to a number of extended business trips, they were built
in stages as time permitted. The original intent was to tune
the crossover myself, starting with a basic, textbook, formula
driven circuit. But as my travels came to an end, all I wanted
to do was sit back, relax and enjoy them. And so the original
textbook crossover remained in place for about a year.
In late
1995, I took some time and measured these speakers with a
Radio Shack SPL meter. The resulting numbers confirmed the
audible rising high end that I found annoying. It also showed
a 5dB dip at 4 KHz which I did not hear. I decided to ignore
the dip which happens to be close to the intended crossover
frequency of 4500 Hz and was thus most likely a crossover
bug. As for the rising high end, I eventually did minimal
work by placing a 4 ohm resistor in series with tweeter. The
resulting sound was much more to my liking and they remain
in this state to this day. The imaging is quite good, and
when used with my NHT 1259 based
subwoofer they sound super, IMHO.
NOTE - It's
important to emphasize that this design is far from perfect.
It represents what happens when a novice tries to built speakers
from scratch with few tools and relatively little knowledge
beyond the fundamentals. The lessons learned are as much on
the how-to as on the how-not-to. But perhaps most important
of all, the overall satisfaction of creating something that,
in my humble and admitedly biased opinion sounds far better
then most mass-market speakers makes the project worth the
time I invested.
The drivers
For simplicity,
I went with a sealed box design. The woofer used is an
ACI AC7. This is a 6.5 inch, 8 ohm treated paper woofer
with a foam surround. A nearly identical woofer is Vifa's
C17WG-08. In a small sealed enclosure of a bit under 0.6 cubic
feet, the calculated F3 is 61 Hz. Actual measurement confirmed
a final F3 in the 60's. In use, the satellite and subwoofer
are driven via an active crossover set at 100 Hz so the satellite's
low end response is not very crucial.
The tweeter
used is a Vifa D25AG-05-06. This is a 6 ohm, aluminum alloy
dome tweeter. The Vifa D25AG-35-06 is similar but has a lower
Fs (1500 Hz versus 850 Hz). Since I used a relatively high
crossover frequency of 4500 Hz, this was not an issue. The
tweeter's high end response is well over 20 KHz.
The crossover
As mentioned
earlier, the crossover is nothing to be proud of; yet the
results are quite pleasing to my ears. The circuit is a 4th
order Linkwitz-Riley design consisting of two inductors and
two capacitors in each of the tweeter and woofer networks.
The tweeter network also has an series 4 ohm resistor as mentioned
earlier. Component values for the chosen crossover value of
4500 Hz can be derived from cookbook formulas such as those
in the Loudspeaker Design Cookbook by Vance Dickason.
The Radio
Shack SPL meter I used to measure the speaker's SPL is spec'ed
at 32 Hz to 10 KHz +/- 3 dB. Using a Stereophile test CD,
the speaker's response is 90 dB +/- 3 dB from 80Hz to 10 KHz
with a 2.83V input measured on-axis at 1 meter, except for
a room (floor) notch in the vicinity of 160 to 200 Hz where
it is down 6 dB. The previously mentioned dip at 4 KHz actually
falls within the +/- 3 dB error range. In the narrower range
from 400 Hz to 10 KHz, the response is much flatter at 92
dB +/- 1.5 dB with the exception of the notch at 4 KHz. Below
80 Hz, the response drops another 0.5 dB at 63Hz before falling
off at roughly 12 dB per octave as expected. All-in-all, the
response is quite respectable, especially when one considers
that these are in-room measurement.
The box
 The enclosure
is made of 3/4 inch MDF and is veneered with rosewood on five
sides. The back is painted flat black. The external dimensions
(in inches) are roughly 9.75 wide by 15.625 tall by 10.75
deep. Each panel of the box was veneered separately after
first dry-fitting all the pieces. The two panels that make
up the left and right sides are rabbetted on the top and bottom
so that the top and bottom pieces sit partially in the rabbet.
This leaves a missing square that is filled in with a piece
of solid cherry which is then rounded over. Hopefully, this
picture will show what I mean. Notice the solid cherry
piece on the four corners of the enclosure. The reasons for
using the solid cherry are (1) to provide an easy surface
to round over the edges and (2) to prevent exposed end grain
on the veneer which could be easily damaged. The enclosure
is made of 3/4 inch MDF and is veneered with rosewood on five
sides. The back is painted flat black. The external dimensions
(in inches) are roughly 9.75 wide by 15.625 tall by 10.75
deep. Each panel of the box was veneered separately after
first dry-fitting all the pieces. The two panels that make
up the left and right sides are rabbetted on the top and bottom
so that the top and bottom pieces sit partially in the rabbet.
This leaves a missing square that is filled in with a piece
of solid cherry which is then rounded over. Hopefully, this
picture will show what I mean. Notice the solid cherry
piece on the four corners of the enclosure. The reasons for
using the solid cherry are (1) to provide an easy surface
to round over the edges and (2) to prevent exposed end grain
on the veneer which could be easily damaged.
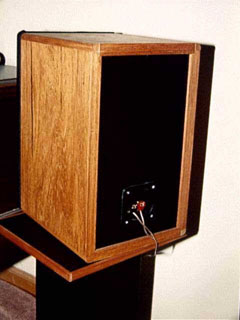
 The back
MDF panel is rabbetted into all four sides (left, right, top,
bottom) and recessed 1/4 inch. It is finished with black spray
enamel paint plus a clear topcoat. The terminal cup is mounted
with four screws and caulked from the inside to seal the opening
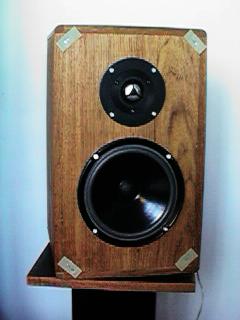
as tightly as possible. The front looks like this without the grill on. The baffle is rabbetted
into the four sides and sits flush with them. The four whitish
rectangular objects at the corners are velcro pads I stappled
into the MDF to hold the grill. They work surprisingly well,
though it lacks that finished look !
The back
MDF panel is rabbetted into all four sides (left, right, top,
bottom) and recessed 1/4 inch. It is finished with black spray
enamel paint plus a clear topcoat. The terminal cup is mounted
with four screws and caulked from the inside to seal the opening
as tightly as possible. The front looks like this without the grill on. The baffle is rabbetted
into the four sides and sits flush with them. The four whitish
rectangular objects at the corners are velcro pads I stappled
into the MDF to hold the grill. They work surprisingly well,
though it lacks that finished look !
I forgot
to recess the drivers during construction so that they could
be flush mounted, so I ended up just surface mounting them.
This meant that the grill had to allow driver clearance. The
grill is just a piece of MDF with a center rectangle removed.
Acoustical fabric is then stretched over the unit and stappled
on the back side. Finally the corresponding velcro pads are
stappled in place. All exterior veneer surfaces are finished
with Danish oil and wax.
The crossover
is build on a small board and screwed to the back of the enclosure
on the inside. Internal bracing consists of just some reinforcement
along the top and bottom inside edges where the cherry is.
These were the weakest points in the original box. No other
bracing was added as the box is fairly small. The result is
a very strong, stiff and heavy box.
The result
Simply put,
I like them. The addition of subwoofers really helps the low
end, but that alone doesn't explain the nicely detailed sound.
I'm generally not a fan of metal domes, and prefer the textile
ScanSpeak dome in my 3-way speakers
over the Vifa. Prior to adding the tweeter series resistor,
I found the speakers tiring after long periods of listening.
Damping the high end with the resistor cured the problem and
I now find myself comfortably listening to hours of music
through these speakers
Lessons learned
I like to
make things. I also like to learn from my projects. This speaker
was no exception. I made several mistakes such as the mouting
of the crossover which made it difficult to tweak later (this
inspired the crossover mounting in my aforementioned 3-way
speaker which I built later). I forgot to mount the drivers
flush; did not account for the grill's attachment to the baffle
(hence the velcro); and did not pay as much attention to the
crossover as I should have. I learned to apply veneer with
a household iron; realize nuances in the music I listen to
which I had previously missed (due to really poor speakers)
and decided to better plan future projects so that I give
them the attention they need. I also believe that I lucked
out on the crossover and that it could have come out much
worse. But on the plus side, this project enticed me to once
again enjoy listening to music.
In Closing
I've purposely
left out the details of the speaker since the methodology
I used and the results I got are not what a DIYer should strive
for. There are many other speakers on the net, far better
than this, for beginners to build. In fact, it is for this
reason that I had neglected to complete the write up of this
speaker project for so long. I present this abbreviated description
NOT to show how to build speakers; rather I present it as
a summary of what I did so that others can learn from my mistakes.
I used this project as a starting point to built other speakers;
and like all things I build, I tried to learn bits and pieces
from the work itself. Maybe others will get something out
of this as I have :)
Update (7/97)
 As of this
writing, I am in the process of completing some new speakers
and have thus taken the time to update this pair. I particularly
disliked the existing velcro grill; they were surprisingly
difficult to remove and failed the "completeness"
test. I decided to retrofit the grill with traditional socket
grill connectors from Madisound.
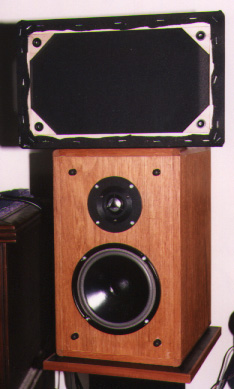
This involved gluing triangular MDF corners to the grill to
provide enough surface area to hold the sockets. The balls
are mounted to the baffle. Whereas the grill fabric was previously
stappled in place, this time, I added hot glue. Here is the
retrofitted grill and speaker. As of this
writing, I am in the process of completing some new speakers
and have thus taken the time to update this pair. I particularly
disliked the existing velcro grill; they were surprisingly
difficult to remove and failed the "completeness"
test. I decided to retrofit the grill with traditional socket
grill connectors from Madisound.
This involved gluing triangular MDF corners to the grill to
provide enough surface area to hold the sockets. The balls
are mounted to the baffle. Whereas the grill fabric was previously
stappled in place, this time, I added hot glue. Here is the
retrofitted grill and speaker.
|